A proper Export window, more codecs, and the crash that ate my 8 GB of RAM
Speed was sorted. The Export window itself was still a plain form, though, and it only did MP4 with H.264.
So today was mostly about making export feel like a real editor’s export.
The new Export window
It’s laid out the way I’m used to from other editors. A preview picture and a “this will make” file list on the left, settings on the right.
- Video and Audio ticks. Both on = video with sound plus a separate sound file. Audio only = just the sound.
- Codecs: H.264, H.265, VP9, AV1
- Containers: MP4, MOV, MKV, WebM (only the ones that can actually hold the codec you picked)
- Resolution list per aspect ratio, bit rate presets (Low / Recommended / High / Maximum / Custom), frame rate
- Audio: AAC, MP3, Opus, FLAC, WAV, mono or stereo
- Captions as
.srt,.vttor.assnext to the video
While it renders, the left panel follows the frames being exported live. Nice for spotting a broken layer without waiting for the whole thing.
The crash
H.265, VP9 and AV1 kept getting force-stopped on the ThinkPad. It has 8 GB of RAM.
The cause was a queue. The queue in front of the encoder had no limit. A raw 1080x1920 RGBA frame is about 8 MB, and whenever the encoder was slower than the renderer, frames just kept piling up.
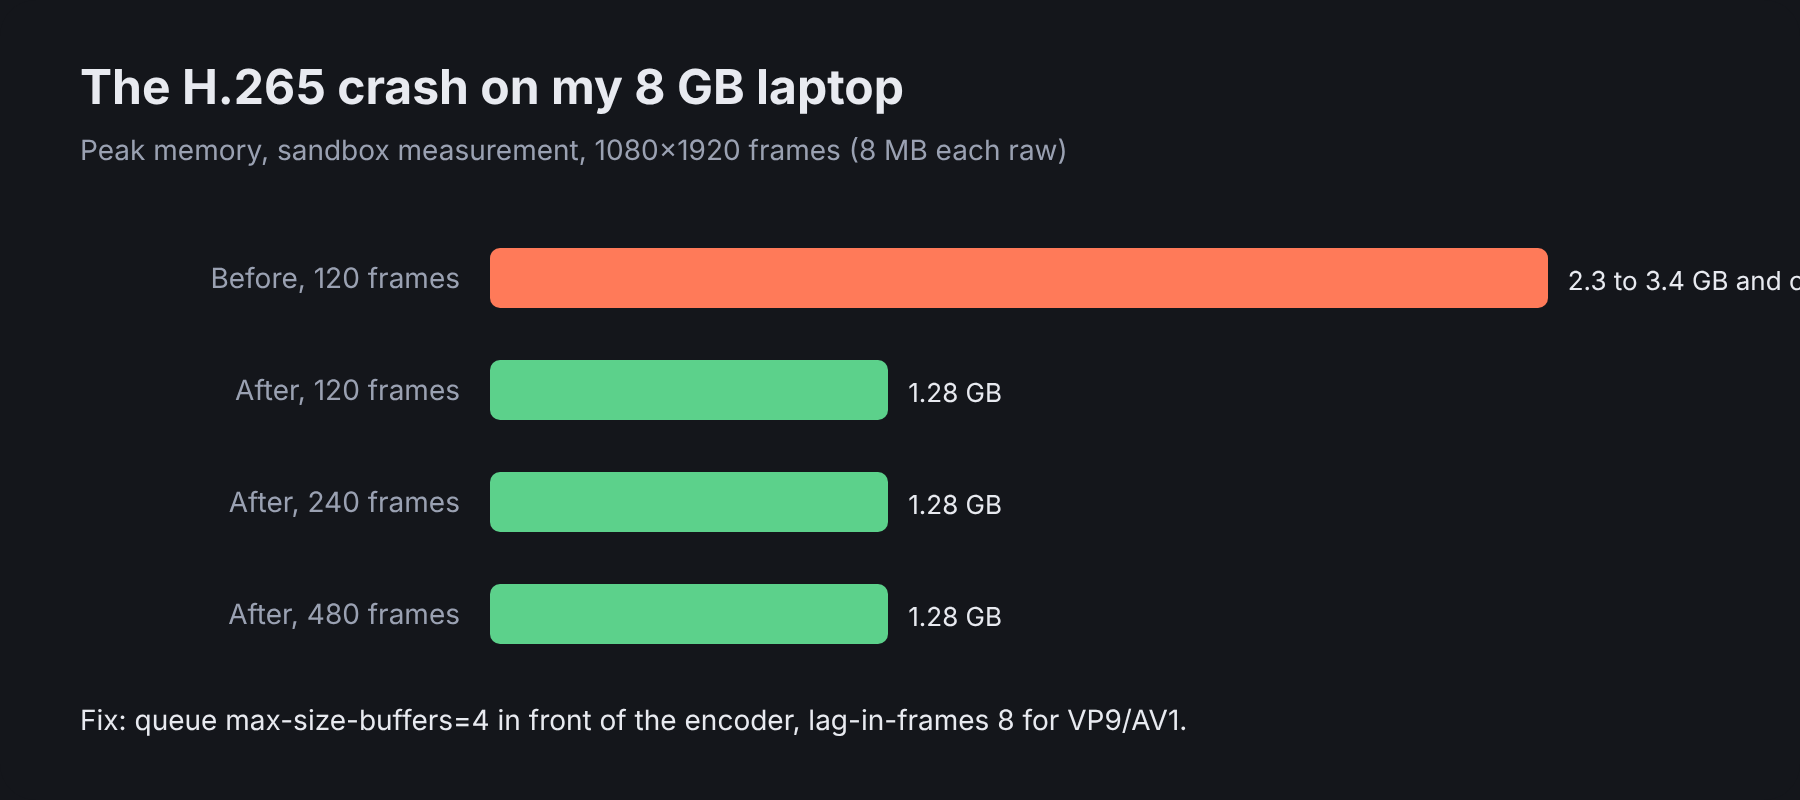
In the sandbox it was already at 2.3 to 3.4 GB after only 120 frames. The fix was tiny:
... ! queue max-size-buffers=4 ! <encoder> ! ...

vp9enc / av1enc: lag-in-frames=8
After that, peak memory stays at about 1.28 GB whether it’s 120, 240 or 480 frames. On the real laptop a full H.265 render ran without a crash or any lag. And the bounded queue didn’t slow H.264 down one bit.
Real times on the ThinkPad (234 s project, VA-API, graphics chip compositing):
| Codec | Performance mode | Battery mode |
|---|---|---|
| H.264 (hardware) | 0:42 | 1:14 |
| H.265 (hardware) | 1:11 | 2:13 |
| x265 (software) | 7:46 | |
| AV1 (software) | 2:23 | |
| VP9 (software) | 10:57 |
VP9 is slow. I know. Tuning it is parked for now.
Range export and presets
Two things I use constantly in CapCut and wanted from day one:
- Export a range or selected clips.
Ctrl+Shift+Xputs the timeline into range mode with draggable handles, dims everything outside, and snaps to frames and the playhead. Enter exports. Caption files get cut and shifted to match. - Presets for sites: YouTube, Shorts, TikTok, Reels, feed, story, Facebook, X, LinkedIn, Web (WebM), Small file, Archive, Sound only (MP3). Touch any control and it goes back to “No preset”.
The sound file also gets made in parallel with the video now, on its own thread. Small win, but it’s a few seconds off every export.
Naming things is hard
The Encoder / Rendering rows went through three names in three builds. They’re now under Advanced Settings as:
- Encoding: Automatic / Graphics chip / Processor
- Acceleration: Automatic / Graphics card / Processor
- Graphics card: Available / Not available
The Codec list only shows formats your chosen encoder can actually make. No more picking AV1 and finding out at the end that your chip can’t do it.